INTRODUCTION
ASP.NET MVC is a new framework for building Web applications developed by Microsoft; it was found that the traditional WebForm abstraction, designed in 2000 to bring a “desktop-like” development experience to the Web, was sometimes getting in the way, and could not provide proper separation of concerns, so it was difficult to test. Therefore a new, alternative framework was built in order to address the changing requirements of developers. It was built with testability, extensibility and freedom in mind.
I will first explain how to setup your environment to work with ASP.NET MVC and how to create an ASP.NET MVC Web application. Then it will go deeper in details explaining the various components of the framework and showing the structure of the main API. Finally, it will show a sample of standard operation that developers can do with ASP.NET MVC.
PREREQUISITES
The ASP.NET MVC is a new framework, but it’s based on ASP.NET core API: in order to understand and use it, you have to know the basic concepts of ASP.NET. Furthermore, since it doesn’t abstract away the “Web” as the traditional WebForm paradigm does, you have to know HTML, CSS and JavaScript in order to take full advantage of the framework.
INSTALLATION
To develop a Web site with ASP.NET MVC, all you need is Visual Studio 2008 and the .NET Framework 3.5 SP1. If you are an hobbyist developer you can use Visual Web Developer 2008 Express Edition, which can be downloaded for free at the URL: http://www.microsoft.com/express/vwd/.
You also need to install the ASP.NET MVC library, which can be downloaded from the official ASP.NET Web site at http://www.asp.net/mvc/download.
You can also download everything you need, the IDE, the library, and also a free version of SQL Server (Express Edition) through the Web Platform Installer, available at: http://www.microsoft.com/web/.
THE MVC PATTERN
As you probably have already guessed from the name, the framework implements the Model View Controller (MVC) pattern.

The UI layer of an application is made up of 3 components:
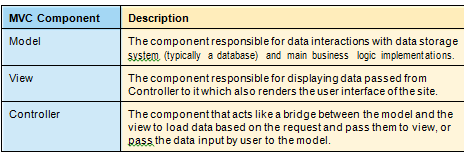
And the flow of an operation is depicted in the diagram:
1. The request hits the Controller. 2. The Controller delegates the execution of “main” operation to the Model.
3. The Model sends the results back to the Controller.
4. The Controller formats the data and sends them to the View.
5. The View takes the data, renders the HTML page, and sends it to the browser that requested it.
BUILD YOUR FIRST APPLICATION
Starting the developing of an ASP.NET MVC application is easy. From Visual Studio just use the “File > New Project” menu command, and select the ASP.NET MVC Project template (as shown in the following figure).

Type in the name of the project and press the “OK” button. It will ask you whether you want to create a test project (I suggest choosing Yes), then it will automatically create a stub
ASP.NET MVC Web site with the correct folder structure that you can later customize for your needs.
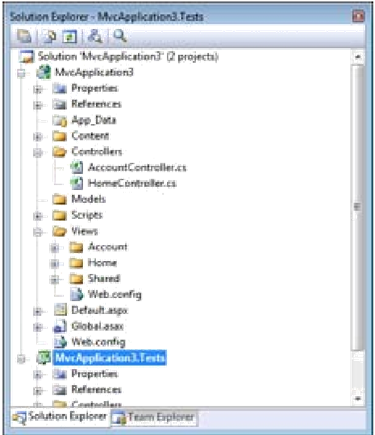
As you can see, the components of the applications are well-separated in different folders.

The Fundamentals of ASP.Net MVC
One of the main design principles of ASP.NET MVC is “convention over configuration”, which allows components to fit nicely together based on their naming conventions and location inside the project structure.
The following diagram shows how all the pieces of an ASP.NET MVC application fit together based on their naming conventions:

ROUTING
The routing engine is not part of the ASP.NET MVC framework, but is a general component introduced with .NET 3.5 SP1.
It is the component that is first hit by a request coming from the browser. Its purpose is to route all incoming requests to the correct handler and to extrapolate from the URL a set of data that will be used by the handler (which, in the case of an ASP.NET MVC Web application, is always the MvcHandler) to respond to the request.

To accomplish its task, the routing engine must be configured with rules that tell it how to parse the URL and how to get data out of it. This configuration is specified inside the RegisterRoutes method of the Global.asax file, which is in the root of the ASP.NET MVC Web application.

The snippet above shows the default mapping rule for each ASP.NET MVC application: every URL is mapped to this route, and the first 3 parts are used to create the data dictionary sent to the handler. The last parameter contains the default values that must be used if some of the URL tokens cannot be populated. This is required because, based on the default convention, the data dictionary sent to the MvcHandler must always contain the controller and the action keys.
Examples of other possible route rules:

MODEL
ASP.NET MVC, unlike other MVC-based frameworks like Ruby on Rails (RoR), doesn’t enforce a convention for the Model. So in this framework the Model is just the name of the folder where you are supposed to place all the classes and objects used to interact with the Business Logic and the Data Access Layer. It can be whatever you prefer it to be: proxies for Web services, ADO.NET Entity Framework, NHibernate, or anything that returns the data you have to render through the views
CONTROLLER
The controller is the first component of the MVC pattern that comes into action. A controller is simply a class that inherits from the Controller base class whose name is the name of a controller and ends with “Controller,” and is located in the Controllers folder of the application folder structure. Using that naming convention, the framework automatically calls the specified controller based on the parameter extrapolated by the URL.

ACTION METHOD
An action method is nothing but a public method inside a Controller class. It usually returns a result of type ActionResult and accepts an arbitrary number of parameters that contain the data retrieved from the HTTP request.
Here is what an action method looks like:

The ViewData is a hash-table that is used to store the variables that need to be rendered by the view: this object is automatically passed to the view through the ActionResult object that is returned by the action. Alternatively, you can create your own view model, and supply it to the view.

This second approach is better because it allows you to work with strongly-typed classes instead of hash-tables indexed with string values. This brings compile-time error checking and Intellisense.
Once you have populated the ViewData or your own custom view model with the data needed, you have to instruct the framework on how to send the response back to the client. This is done with the return value of the action, which is an object that is a subclass of ActionResult. There are various types of ActionResult, each with its specific way to return it from the action.

MODEL BINDER
Using the ActionResults and the ViewData object (or your custom view model), you can pass data from the Action to the view. But how can you pass data from the view (or from the URL) to the Action? This is done through the ModelBinder. It is a component that retrieves values from the request (URL parameters, query string parameters, and form fields) and converts them to action method parameters.
As everything in ASP.NET MVC, it’s driven by conventions: if the action takes an input parameter named Title, the default Model Binder will look for a variable named Title in the URL parameters, in the query string, and among the values supplied as form fields.

But the Model Binder works not only with simple values (string and numbers), but also with composite types, like your own objects (for example the ubiquitous User object). In this scenario, when the Model Binder sees that an object is composed by other sub-objects, it looks for variables whose name matches the name of the properties of the custom type.
Here it’s worth taking a look at a diagram to make things clear:

The next and last component is the view. When using the default ViewEngine (which is the WebFormViewEngine) a view is just an aspx file without code-behind and with a different base class.
Views that are going to render data passed only through the ViewData dictionary have to start with the following Page directive:
<%@ Page Language=”C#” MasterPageFile=”~/Views/Shared/Site.Master”
Inherits=”System.Web.Mvc.ViewPage” %>
If the view is also going to render the data that has been passed via the custom view model, the Page directive is a bit different, and it also specifies the type of the view model:
<%@ Page Language=”C#” MasterPageFile=”~/Views/Shared/Site.Master”
Inherits=”System.Web.Mvc.ViewPage
You might have noticed that, as with all normal aspx files, you can include a view inside a master page. But unlike traditional Web forms, you cannot use user controls to write your HTML markup: you have to write everything manually. However, this is not entirely true: the framework comes with a set of helper methods to assist with the process of writing HTML markup.
You’ll see more in the next section.
Another thing you have to handle by yourself is the state of the application: there is no ViewState and no Postback.
HTML HELPER
You probably don’t want to go back writing the HTML manually, and neither does Microsoft want you to do it. Not only to help you write HTML markup, but also to help you easily bind the data passed from the controller to the view, the ASP.NET MVC Framework comes with a set of helper methods collectively called HtmlHelpers. They are all methods attached to the Html property of the ViewPage. For example, if you want to write the HTML markup for a textbox you just need to write:
<%= Html.Textbox(“propertyName”)%>
And this renders an HTML input text tag, and uses the value of the specified property as the value of the textbox. When looking for the value to write in the textbox, the helper takes into account both the possibilities for sending data to a view:
It first looks inside the ViewData hash-table for a key with the name specified, and then looks inside the custom view model, for a property with the given name. This way you don’t have to bother assigning values to input fields, and this can be a big productivity boost, especially if you have big views with many
fields.
Let’s see the HtmlHelpers that you can use in your views:

As alternative to writing Html.BeginForm and Html.CloseForm methods, you can write an HTML form by including all its elements inside a using block:
<% using(Html.BeginForm(“Save”)) { %>
<!—all form elements here -->
<% } %>
To give you a better idea of how a view that includes an editing form looks like, here is a sample of a complete view for editing an address book element:
<%@ Page Language=”C#” MasterPageFile=”~/Views/Shared/Site.Master”
Inherits=”System.Web.Mvc.ViewPage
<% using(Html.BeginForm(“Save”)) { %>
Name: <%= Html.Textbox(“Name”) %>
Surname: <%= Html.Textbox(“Surname”) %>
Email: <%= Html.Textbox(“Email”) %>
Note: <%= Html.TextArea(“Notes”, 80, 7, null) %>
Private <%= Html.Checkbox(“IsPrivate”) %>
<% } %>
T4 TEMPLATE
But there is more: bundled with Visual Studio there is a template engine (made T4 as in Text Template Transformation Toolkit) that helps automatically generate the HTML of your views based on the ViewModel that you want to pass to the view.
The “Add View” dialog allows you to choose with which template and based on which class you want the views to be generated

What these templates do is mainly iterating over all the properties of the ViewModel class and generating the same code you would have probably written yourself, using the HtmlHelper methods for the input fields and the validation messages.
For example, if you have a view model class with two properties, Title and Description, and you choose the Edit template, the resulting view will be:
<%@ Page Title=”” Language=”C#” MasterPageFile=”~/Views/Shared/Site.
Master”
Inherits=”System.Web.Mvc.ViewPage
runat=”server”>
Edit

AJAX
The last part of ASP.NET MVC that is important to understand is AJAX. But it’s also one of the easiest aspects of the framework.
First, you have to include the script references at the top of the page where you want to enable AJAX (or in a master page if you want to enable itfor the whole site):
And then you can use the only 2 methods available in the AjaxHelper: ActionLink and BeginForm.
They do the exact same thing as their HtmlHelper counterpart, just asynchronously and without reloading the page. To make the AJAX features possible, a new parameter is added to configure how the request and the result should be handled. It’s called AjaxOptions and is a class with the following properties:

For example, here is a short snippet of code that shows how to update a list of items using the AJAX flavor of the BeginForm method:
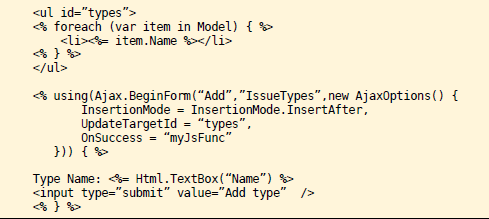
The AJAX call will be sent to the Add action inside the IssueType controller. Once the request is successful, the result sent by the controller will be added after all the list items that are inside the types element. And then the myJsFunc will be executed. But what the ASP.MVC library does is just enabling these two methods: if you want more complex interactions you have to use either the AJAX in ASP.NET library or you can use jQuery, which ships as part of the ASP.NET MVC library.
If you want to use the AJAX in ASP.NET library, you don’t have to do anything because you already referenced it in order to use the BeginForm method, but if you want to use jQuery, you have to reference it as well.
One benefit of having the jQuery library as part of the ASP.NET MVC project template is that you gain full Intellisense support. But there is an extra step to enable it: you have to reference the jQuery script both with the absolute URL (as above) needed by the application and with a relative URL, which is needed by the Intellisense resolution engine. So, at the end, if you want to use jQuery and enable Intellisense on it, you have to add the following snippet:
<% if(false> { %>
<% } %>
Happy MVC :)

No comments:
Post a Comment